Tuesday, January 3, 2012

Coffee Shortbread Bars with Butterscotch Glaze


In celebration of the New Year (and in preparation...I needed the caffeine kick in order to stay up), I turned to Flo Braker's Butterscotch-glazed Coffee Shortbread Bars to finish off a fantastic end-of-the-year dinner.  These bars make a great after-meal snack or an accompaniment to a cup of coffee/tea.  Beware of glazing these bars, though!  Any hesistance in spreading the glaze, and it'll start to solidify. Getting a nice, even layer will become a painstaking task.  Other than that, this was a simple recipe to follow with great results.  Also, be wary of picking too strong of an espresso blend.  Otherwise, the coffee flavor of the shortbread will overpower the flavor of the butterscotch glaze.


Coffee Shortbread Bars with Butterscotch Glaze (makes 40 bars)

Special tools: mini offset spatula

Coffee Shortbread

2 sticks unsalted butter, softened
½ cup, plus 1 tablespoon sugar
1 teaspoon pure vanilla extract
¼ teaspoon salt
2 ¼ cups, plus 2 tablespoons all-purpose flour
1 tablespoon finely ground espresso beans

1.  Preheat the oven to 300°F and position a rack in the center of the oven.
2.  Line the bottom of a 9-by-13-inch baking pan with parchment paper.
3.  Using a standing electric mixer fitted with a paddle, beat the butter with the sugar at medium speed, until fluffy and very pale (about 5 minutes).
4.  Beat in the vanilla and salt.
5.  In a separate bowl, whisk the flour with the ground espresso beans.
6.  Add the flour mixture to the egg and sugar mixture in 3 batches, scraping down the sides of the bowl.  Continue beating just until the dough is combined.
7.  Press the dough into an even layer in the prepared baking pan.
8.  Spread a sheet of plastic wrap directly onto the dough.
9.  Using a flat-bottomed glass, smooth the dough into an even layer.
10.  Remove the plastic wrap.
11.  Bake the shortbread for about 50 minutes, until very lightly browned on top and firm, but not solid to the touch.
12.  Allow to cool on a rack for about 10 minutes.
13.  Using a ruler, cut the warm shortbread lengthwise into 8 strips, then cut crosswise into 5 rows.
14.  Let the shortbread bars to cool completely.

Butterscotch Glaze

4 tablespoons unsalted butter, softened
⅓ cup packed light brown sugar
1 tablespoon brewed strong espresso
1 tablespoon light corn syrup
Pinch of salt
(Optional) 40 chocolate-covered espresso beans

1.  In a heavy saucepan, combine the butter, brown sugar, brewed espresso, light corn syrup, and salt.
2.  Bring to a boil over moderate heat, swirling the pan.
3.  Continue to boil just until slightly thickened (about 1 ½ to 2 minutes).
4.  Remove from heat.
5.  When bubbling subsides, immediately pour the hot glaze over the shortbread.
6.  Working quickly, spread the glaze into an even layer with a mini offset spatula.
7.  Using the tip of a lightly oiled paring knife, score the glaze between the cuts, without dragging.
8.  (Optional)  Press a chocolate-covered espresso bean into the center of each bar.
9.  Allow bars to cool slightly before serving.

Thursday, December 22, 2011

Almond Frangipane Tart with Honey-Poached Pears

Attempt# 1
I finally got a chance to make a version of Honoré Artisan Bakery's Ballard Honey-poached Pear Almond Frangipane I was holding out for quite some time as I wanted to find a tartlette pan that would allow me to replicate what I had at Honoré.  I may have been a tad too picky in the tartlette pan that I wanted, but you would not believe how difficult (and frustrating) my search became.  After months of searching, I caved and bought a regular 9" tart pan. 

The recipes I used for the tart crust and frangipane are by Dorie Greenspan.  Greenspan's recipe gave me my first crack at making pâte sablée for the crust, one of the three classic French pastry doughs.  The pear recipe is a riff off of Bon Appétit's recipe for Honey-Poached Pears with Crème Fraîche.   

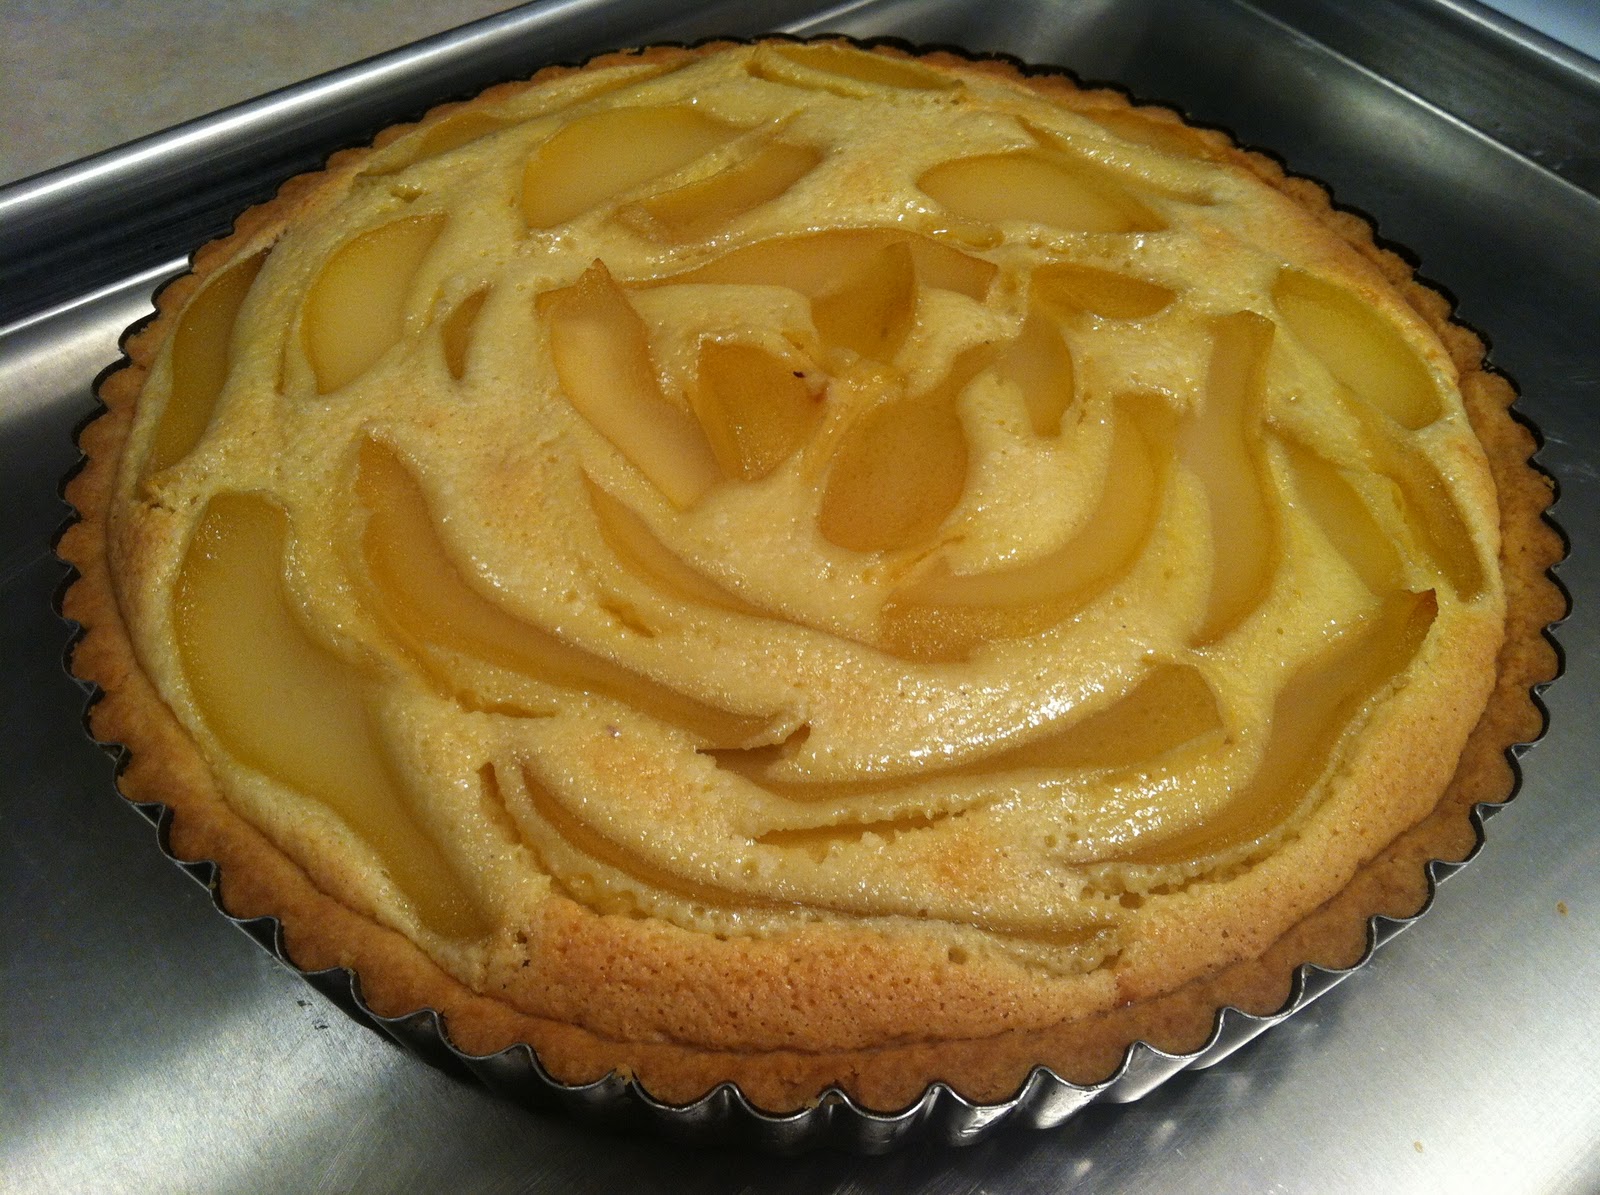
Judging by my friends' reactions, the tart was a success!  My friends gobbled up half of the tart (even after a very filling dinner) and they were more than eager to help take some of the left over tart off my hands.  For me, the combination of the almond and pears were a great match- the frangipane was savory-like and balanced the sweetness of the pears.  The almond flavor was a bit overpowering for my taste and I was not happy with the appearance of the tart, specifically how the pears sank into the franipane.  The tart also would have fared better with riper pears and less star anise.

 
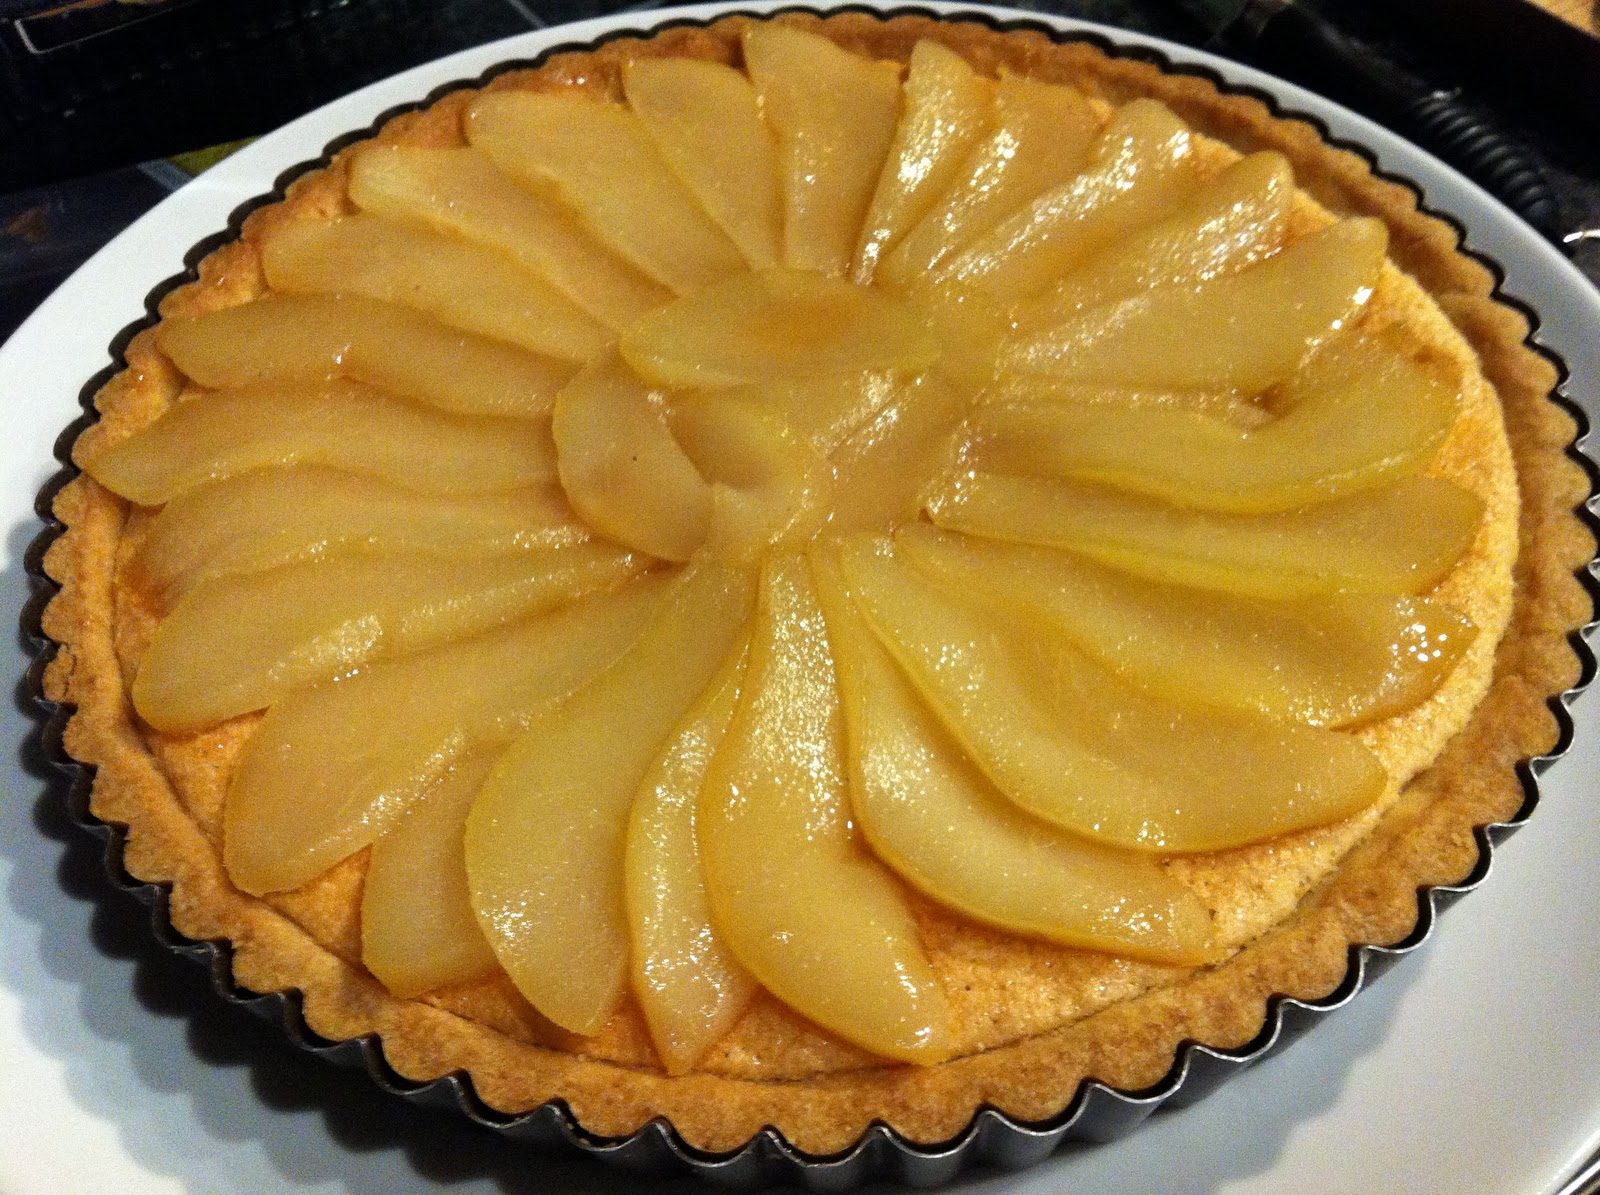
I got a second opportunity to make this tart for a Christmas Eve dinner.  I wanted to account for the strong almond and star anise flavors and the aesthetic appearance of my first attempt.  So, this time around, I used less almond extract (1.5 tablespoons) and about half the amount of star anise.  Also, I allowed the tart to bake completely before placing the pears atop the frangipane.  The end result, was even better than the first attempt.  The almond flavor was a bit more subdued and the appearance was improved a hundred times over, in my opinion.  Although, this second attempt resulted in a frangipane filling that was slightly mushy in texture due to the pears having some excess moisture.  Next time, I'll be sure to dry them off more and strive for the perfect tart!

Attempt# 2
Pear and Almond Frangipane Tart (makes one 9-inch tart)

Special tools: Food processor
                      9-inch tart tin with removable bottom

Honey-Poached Pears
2 ½ cups water
1 cup honey
4-5 whole star anise
2 cinnamon sticks
2 tablespoons fresh lemon juice
Pinch of fine sea salt
4 medium firm but ripe pears, peeled, quartered, and cored

1.      Combine all ingredients, except the pears, in a large saucepan.
2.      Bring to boil over medium heat, stirring occasionally.
3.      Add pears and reduce heat to simmer until tender, turning occasionally.
4.      Using slotted spoon, transfer pears to a plate or bowl to cool.
5.      (Optional) Remove star anise pods/seeds and cinnamon sticks.  Boil poaching liquid until reduced to a syrup-like consistency.


Pâte Sablée
1 ½  cups flour
½ cup confectioner’s sugar
½ teaspoon salt
9 tablespoon butter, very cold, cut into small pieces
1 egg yolk

1.      Put the flour, confectioner’s sugar, and salt in a food processor and pulse a few times to combine.
2.      Add the pieces of cold butter and pulse until the butter is cut into pea-sized pieces.
3.      Add the egg yolk and combine in several pulses until the dough starts to turn from dry to clumpy. Do not let the dough form one giant ball or it will be overworked – just keep checking after every pulse and when the dough pieces looks like they will stick when you press them together, stop.
4.      Butter a 9-inch tart tin with removable bottom.
5.      Turn the dough out into the tin and press into the bottom and up the sides with your fingers. You probably will not need all the dough – save the extra for patching the shell after you bake it. Do not press the dough too hard or it will become tough, just enough for it to form to the tin.
6.      Freeze the tart shell for at least 30 minutes.
        7.      Preheat the oven to 375°F.
8.      Take a piece of foil and butter the shiny side, then press the buttered side tightly to the shell.  Pie weights will not be necessary.
9.      Place the tart shell on a baking sheet and bake for about 25 minutes, until the shell is dry and lightly colored, partially baked.
10.  If any places have cracked, repair with the extra dough.
11.  Let cool on a rack until room temperature.


Frangipane

6 tablespoons butter, at room temperature
⅔ cup sugar
¾  cup ground blanched almonds
2 teaspoons flour
1 teaspoon cornstarch
1 large egg, plus 1 egg white
1 teaspoon vanilla extract
2 teaspoons almond extract

1.      Combine the butter and sugar in the food processor and combine until smooth.
2.      Add the ground almonds and blend together.
3.      Add the flour and cornstarch, and then the egg and egg white. Process the mixture until it is very smooth.
4.      Add in the vanilla and almond extracts just to blend.

The frangipane can be used immediately or you can store it in the refrigerator for up to 2 days. If it becomes too firm in the fridge, let it sit at room temperature to soften before using.

5.      Preheat the oven to 350°F.
6.      Spread the frangipane evenly into the cooled tart shell.  It should be liquid enough to smooth out on its own so you don’t need to work too much on it.
7.      Take the poached pears and cut each pear half crosswise into thin slices, about ¼-inch thick.
8.      Carefully place the pear slices onto the frangipane in a decorative manner– you can move the pear slices after you place it, but not much.
9.      Place the tart on a baking sheet and bake in the oven for about 45-50 minutes, until the frangipane is puffed, golden brown, and firm to the touch.
10.  Cool the tart on a wire rack.
11.  (Optional) Using a pastry brush, you can lightly brush the pears with the glaze made from the pear-poaching liquid, or dust confectioner’s sugar over the tart.  Warm up the glaze, if it has become too thick to brush.

Monday, December 12, 2011

Mocha-Crème Cake

Over the past couple of months, I have been slowly (very slowly) reading my way through David Lebovitz's The Sweet Life in Paris.  Filled with humorous anecdotes and delectable recipes, Lebovitz details some of his experiences as an American living in Paris.  One of the recipes included in the book is for a mocha cake made with crème fraîche.  This recipe caught my attention because of the simple recipe (I even made my own crème fraîche!) and the short list of ingredients.  Plus, it calls for a combination dear to my heart: espresso/coffee and chocolate :)


Shortly after reading this recipe, one of my friends organized a potluck...the perfect opportunity to try a new recipe with plenty of guinea pigs taste testers.  The cake turned out beautifully, but extremely delicate and  very rich in flavor.  It's also quite a versatile cake since it can be served frozen, chilled, or at room temperature.  I tried the cake at all three serving temperatures and found that the flavor was not affected.  I guess it comes down to more of a textural preference.  I preferred it chilled since it gives a great mix of the frozen (imagine a rich, chocolate-flavored ice cream) and room temperature (smooth and truffle-like) versions, but this cake is excellent in any form.  One of my friends noted its smooth texture and how similar it tasted to Choc Mod's Truffettes de France (those delicious chocolate truffles available at Costco during the holiday season). 

One of the hinderances of the cakes extreme delicacy is the difficulty that comes with trying to cut those picture perfect slices.  If you're able to, I would suggest freezing the cake and cutting slices while it is frozen.  Otherwise, follow Lebovitz's suggestions and cut the cake with a knife dipped in very hot water and wipe the knife's blade clean after each slice.  Lebovitz also suggests cutting wedges with unflavored dental floss, pulled taut.  Check out the recipes for the cake and the crème fraîche below!


Crème Fraîche (makes 1 cup):

1 cup heavy cream
1 ½ tablespoons buttermilk

1.  Mix the cream and the buttermilk in a bowl.
2.  Cover with a tea towel or plastic wrap and store in a warm spot for 12 hours, longer if using ultra-pasteurized cream (until thickened and slightly tangy).
3.  Refrigerate until ready to use.


Mocha-Crème Cake:

Special tools: 9-inch springform pan
                       Large pan, such as a roasting pan

12 ounces bittersweet or semisweet chocolate, chopped (I used Ghirardelli's 60% cacao bittersweet chocolate)
⅔ cups brewed espresso or strong coffee
¼ cup crème fraîche
5 large eggs at room temperature
Pinch of salt
½ cup sugar

1.  Lightly butter a 9-inch springform pan and wrap the outside of the pan with aluminum foil to form a watertight seal.
2.  Set the cake pan inside a larger pan that will be large enough to make a water bath, such as a roasting pan.
3.  Preheat the oven to 325°F (160°C).
4.  Put the chocolate and espresso/coffee in a large heatproof bowl and place over a saucepan of simmering water to create a double boiler.  Stir gently until melted and smooth.
5.  Remove chocolate mixture from heat and allow to cool to room temperature.
6.  Stir in the crème fraîche.
7.  In a standing mixer, whip the eggs, salt, and sugar on high speed until they hold their shape (about 5 minutes).

8.  Fold half of the whipped egg mixture into the cooled chocolate mixture.
9.  Fold in the remaining egg mixture.
10.  Scrape the batter into the prepared springform pan.
11.  Add warm water into the larger pan until it reaches halfway up the outside of the springform pan, creating a water bath.

12.  Bake for 50-60 minutes, until the cake is slightly firm, but still feels soft in the center.
13.  Lift the springform pan from the water bath, remove foil, and set pan on a cooling rack.
14.  Allow to cool to at least room temperature before serving.  Attempting to slice the cake while it is too warm will result in messy slices with much of the filling stuck to the knife’s blade.


Monday, December 5, 2011

Pear and Fig Pie with Hazelnut Crust


With Thanksgiving, came the opportunity to attempt making a new dessert.  I wanted to make something that featured seasonal fruits.  Pears are something I've been thinking about working with for a while now, so I started flipping through my cook books and magazines in search of a dessert that featured pears and found a pie recipe with pears and figs in the starring roles...score!   

The recipe also calls for a hazelnut crust.  Making a pie crust dough would be a first for me and I've heard numerous stories about how finicky pie crusts can be.  Plus, I knew that I would not have time to test out the recipe before Thanksgiving.  So, naturally, a list of concerns started growing in my head...over baked crust, soggy crust, overly sweet filling, unbalanced flavors...and the list goes on.  Luckily, the cook book (Bon Appétit Desserts: The Cook Book for All Things Sweet and Wonderful) that the recipe is from also included a troubleshooting guide for pies.  With this guide to ease some of my concerns and Bon Appétit's reputation for delicious recipes, I dove right into the pie making. 

Surprisingly, the preparation and process was fairly simple, resulting in a great tasting pie.  I thought the crust could have been stronger in flavor, but it browned nicely and had a crisp exterior while maintaining a flaky, tender interior.  Visions of the dough tearing and sticking were running through my mind, but it turned out to be much easier to roll out than anticipated.  Not a single tear, but there were a couple of spots that lightly stuck to my rolling surface.  The crust on its own had a great nutty flavor.  Unfortunately, it was so weak in flavor, that it was overpowered and masked by the filling's combination of pears, figs, lemon juice, and lemon zest.  Next time, I think I'll do some research to see how I can boost the hazelnut flavor without compromising the texture of the crust.  See the recipe after the pics  :)


Crust:

½ cup hazelnuts (toasted, husked, and cooled)

4 ½ teaspoons sugar

½ teaspoon salt

2 ½ cups unbleached all purpose flour

¾ cup (1 ½ sticks) chilled unsalted butter, cut into ¼-inch cubes

4 tablespoons (or more) ice water


1.   Finely grind nuts, sugar and salt in processor.

2.   Blend in flour.

3.   Add butter, using on/off turns.  Cut in until butter is reduced to rice-sized pieces.

4.   Blend in 4 tablespoons of ice water.  Add in more ice water by teaspoonfuls until dough comes together in moist clumps.

5.   Gather dough into a ball and divide in half.

6.   Flatten each half into disks.  Wrap in plastic and chill for at least 45 minutes

**Crust can be made 1 day ahead, but keep it chilled.  Let soften slightly at room temperature before rolling.


Filling:

1 cup dried black Mission figs (stemmed and quartered)

½ cup sugar

2 tablespoons unbleached all purpose flour

1 tablespoon fresh lemon juice

1 teaspoon finely grated lemon peel

2 ¼ lbs pears (peeled, quartered, cored, and thinly sliced)


1.   Preheat oven to 400°F.

2.   Combine figs, sugar, flour, lemon juice, and lemon peel in a large bowl.

3.   Add pears to fig mixture and toss to blend.

4.   Roll out 1 dough disk on lightly floured surface to 12-inch round.

5.   Transfer to 9-inch diameter glass pie dish

6.   Fill crust with pear mixture.

7.   Roll out another 12-inch round with the second dough disk.

8.   Place on top of filled pie and trim crust overhang to ½-inch.

9.   Press the top and bottom crust together and fold under.

10. Crimp crust edge decoratively.

11. Cut several slits in top crust to allow steam to escape during baking.

12. Bake for 20 minutes

13. Reduce oven temperature to 350°F.

14. Continue to bake until juices bubble thickly through slits and crust is golden (about 50 minutes).

15. Cool pie on rack for 45 minutes.

16. Serve warm or at room temperature.

My Notes:  I found the quartered figs to be too large and overpowering in flavor.  Try cutting them into sixths or eighths.  Also, be sure to let the pie cool as directed, or longer.  This will allow the filling to set.  Otherwise, you may end up with a filling that will ooze all over the plate, or the slice may fall apart as you are plating.

Friday, December 2, 2011

NYC Eats (part III)...The NJ Excursion

In an effort to explore more of NYC and its surrounding areas, I ventured out to New Jersey for a day.  Boy, am I glad I made the (short) trip across the water!  There are some fantastic views of the Manhattan skyline from the numerous parks along the riverbank and the neighborhoods were also fun to explore.  I went to Jersey City and Hoboken.  It was quite a nice retreat away from the hectic ways of Manhattan...there was an instant change in scenery as soon as you stepped out from the subway station.  Gone were the numerous skyscrapers crammed onto each block, packed sidewalks, and congested roads.  Instead, you step out to much more of an open space with large factory-type buildings mixed with modern office buildings, emoting more of an industrial atmosphere. 


I spent a majority of my time in New Jersey walking along Washington Street in Hoboken, which happens to be the location of Carlo's Bake Shop, home of TLC's Cake Boss.  I've never watched the show, so I didn't really know what to expect when I visited the store.  It was quite a mad house, considering the size of the store and the number of people that cram into the small space.  It's also quite an impersonal experience: walk in, grab a ticket, wait for your number to show up on the 'Now Serving' marquee, place your order, pay the cashier, and get ushered out the door by the ever-growing mob of people anxiously waiting for their number to appear on the magical marquee.  Personally, I was a bit put off by the atmosphere.  I ended up just getting a cannoli.  It was one of the best I've had, though...fresh, crisp exterior and a smooth, creamy filling that had just the right amount of sweetness to compliment the fried dough.

I also visited Crumbs Bake Shop, a popular bakery chain that originated in 2003 in the Upper West Side neighborhood of NY.  Today, their stores can be found in many locations along the East Coast and in L.A.  Crumbs specializes in cupcakes, and I had the opportunity to sample a few while I was in Hoboken.  My field of selection was very limited as I am not a fan of cream cheese frosting/filling, which a great majority of their cupcakes included.  An unfortunate thing because so many of their cupcakes looked and sounded scrumptious!  I caved and tasted a couple that included a cream cheese frosting or filling...I just had to pick around, but that didn't allow me to fully enjoy the cupcakes :(


Friday, November 11, 2011

Maison Ladurée Visited

Maison Ladurée storefront display

As expected, I paid a visit to Maison Ladurée during my trip to NYC.  This was the one place that I was most looking forward to visiting.  I must say that Ladurée exceeded my expectations.  Well, at least the macarons excelled.  The store is set up like a boutique with macarons prominently displayed along the counter, while other Ladurée products (teas and perfumes) were displayed in a separate nook and along the walls.  The decor of the store was very posh and the employees seemed be cutouts made for the upscale environment.  Personally, it seemed like the employees were not truly interested in assisting their patrons.  Not once did I see one of them greet a customer or offer assistance.  Instead, they hid behind the counter, waiting for customers to come to them.  I've heard that this is part of the French culture, so maybe that's what they're going for??  I've even heard stories about how some of the employees use fake French accents, too.  I'm guessing that this may be a ploy to try to give people the experience of visiting a true French boutique...the Parisian experience!  They should be careful, though.  They are within close proximity of Québec and Montréal...


Macarons for my friend
Back to the main attraction: macarons!  Rumor has it that the macs sold at Ladurée are flown over from Paris every night.  True, or not, they're well worth the wait (lines can get long) and the price.  At $2.70 a piece, they are slightly more expensive than most macs.  However, in my opinion and based on all the other macs I've tasted, Ladurée makes the best macarons!  The meringue cookie shells have a great, smooth texture with even coloring.  There's an ever so slight crunch as you bite down, but that quickly transitions into the chewy center of the cookies.  Unlike many other macarons that I've tasted, Ladurée's held together after each bite.  No crumbs to catch or shattered meringues here!  Best of all, the fillings provide a perfect balance to the cookies so that you get a great flavor without extreme sweetness.

The macaron flavors that I tasted were orange passion, rose, pistachio, raisin-cinnamon, coconut, and caramel with salted butter.  My favorite was the rose.  In reading reviews, I've found that people either love it, or hate it.  I think for those that did not take a liking to the rose macarons had the general consensus that it was too floral and reminded them of soap or perfume.  I, on the other hand, thought it was the best (and most unique) macaron flavor I've tasted yet!  I found both the rose flavor and the sweetness to be quite light...it was like getting brief wafts of sweet roses with each bite.  Return visits are definitely in the future!


Thursday, November 10, 2011

NYC Eats (part I)

Sadly, my food tour in NYC did not start off on a high note.  My first stop was David Chang's Ssäm Bar, a part of the Momofuku empire.  I've dined at Ssäm Bar before and had an enjoyable experience.  This time around, I was left a bit dissapointed and thought this was a sign of things to come on this trip.  Maybe I went in with my expectations too high for an establishment and chef I have come to know as serving great food.  Portions were small, prices were high, and the food came out with the speed of a fast food chain.  To top it off, both of the dishes I tasted (poached chicken and chanterelles with quail eggs) lacked complexity/depth in flavor...they were basically one-note dishes.  Fortunately, this was just a one-time occuring low during my trip. 

My spirits were immediately lifted and my appetite satiated the next day at Ippudo.  This might not be saying much, considering the ramen selection I have in Seattle (it's not great), but this was by far the best ramen I have ever had!  I also enjoyed some of the tastiest chicken wings to ever meet my taste buds- crispy skin, tender inside, and just a bit of spice.  The ramen I had was, at first, extremely rich and creamy.  But after mixing in the dallop of ginger that topped my ramen, the creamy richness was tamed to just the right level.


Hirata Chicken Wings- fried and then glazed w/ Ippudo's special black pepper sauce

Miso Ramen with additional braised pork belly

Akamaru Modern topped with Ippudo's secret "Umami Dama" miso paste

Another highlight to the trip was Thomas Keller's Bouchon Bakery.  Such a highlight that I actually went to both locations within NYC on consecutive days.  The first Bouchon I visited was located in the Time Warner Center, where I not only enjoyed a top-notch chocolate soufflé, but also a great view of Columbus Circle at night.  The other Bouchon Bakery can be found in Rockefeller Center.  My visit to the Rockefeller Bouchon was during the afternoon, so it was pretty crowded.  Nonetheless, I carried on and got a nice selection of goodies: almond brioche, Nutter Butter cookie, and macarons.  The Nutter Butter cookies was peanut butter overload, but in a good way.  I'm not sure if they used fresh ground peanut butter, but it sure tasted like it!  The macarons were also delightful.  Definitely better than what I have had in Seattle- great texture, but ever so slightly on the sweet side.


Chocolate Soufflé with Crème Anglaise

Almond Brioche

Nutter Butter Cookie

Macarons: cranberry, chocolate, pistachio, salted caramel, pumpkin, and vanilla

Below, are a few other pics of deliciousness.  The brussel sprouts were beyond amazing!  I think they used some sort of balsamic wine that tastes like buttery popcorn when carmelized.  Whatever it was, I definitely want more of it  :p


Housemade Pappardelle pasta from Mario Batali's Lupa


Roasted Brussel Sprouts from Lupa


White Miso Semifreddo from Spot Dessert Bar: blackberries, sesame tuile, and raspberry sorbet

Yuzu Eskimo from Spot Dessert Bar: blackberries, strawberries, raspberry foam, chocolate pearls, oreo "soil", and chocolate ganache